Summer Sales 20 Off for Piotnet Addons & Piotnet Forms
HIDE

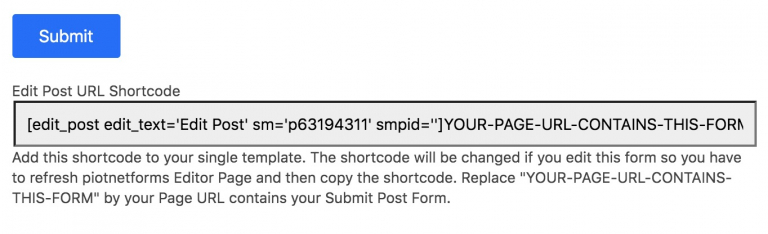
How to customize Frontend Post Submission

This Post Submission empowers your users to submit posts, and edit/delete posts on the frontend. It supports Custom Post Type, Custom Taxonomy, ACF Field, ACF Repeater, Jet Engine, Toolset, Pods, and MetaBox.

Create Fields in your form

  1. Title* Required (Text Type)
  2. Content (TinyMCE/Textarea Type)
  3. Feature Image (Image Upload Type)
  4. Terms Select (Type Terms Select)
  5. Custom Fields (any Field Type)

Add and Edit a Submit Button

Create a Submit Button > Actions After Submit > Add Submit Post

Edit Submit Button > Scroll to Submit Post Section

Enter your Title Field Shortcode (Required), Content Field Shortcode (Option), and Featured Image Field Shortcode (Option)

Custom Fields

General Custom Fields

It supports Custom Post Meta, ACF Field, Jet Engine, Toolset, Pods, and MetaBox.

Click on Submit Button > Custom Fields List > map sequentially your custom field slugs, Field Shortcodes, and custom field types.

First format
submit post 2
submit post 3
Second format
submit-post
In ACF, a colon seperates the Value and Label
submit-post-1
In Piotnet Forms, a Pipe separates the Label and Value

Combine Repeater Fields

It supports ACF Repeater, Jet Engine Repeater, and MetaBox Group.

Step 1:

Firstly, Create MetaBox Group Fields like this

Screenshot 1 5

There are 3 important elements: ID, Field Group ID and Clonable checkbox

Step 2:

Secondly, create Repeater Fields with Repeater ID (Piotnet Forms) = ID in your MetaBox Field Setup

This is a tutorial on how to create repeater fields 

Screenshot 4

Section > Advanced > Repeater.

Put Fields into that Section with the Field IDs = IDs of the Sub Fields(Mandatory)

Note: Avoid using common words like “image” “date” and “time” for custom field slug.

Step 3:

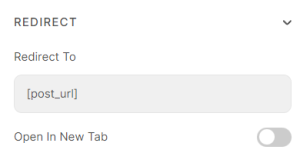
Then Editing Submit Button > Submit Post > Custom Fields > Map repeater elements

Screenshot 3

Step 1:

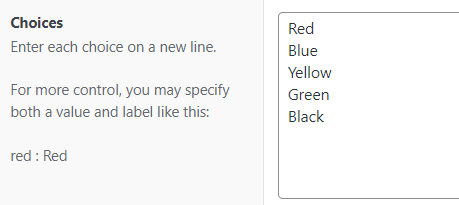
Create ACF Repeater Fields as in the illustration below

submit post acf

Create JetEngine Repeater Fields.

1

Step 2:

Create Repeater Fields with Repeater ID = Repeater Name in your ACF Field/JetEngine Field.

This is a tutorial on how to create repeater fields https://piotnetforms.com/docs/repeater-fields-multi-level-nested/

Screenshot 1

Section > Advanced > Repeater.

Put Fields into that Section with the Field IDs = IDs of the Sub Fields (Mandatory), such as name, and image.

Step 3:

Then Editing Submit Button > Submit Post > Custom Fields > Map your repeater fields

Screenshot 2

Edit Post Shortcode

Add this shortcode to your single template.

The shortcode will be changed if you edit this form, so you have to refresh piotnetforms Editor Page and then copy the shortcode. Replace “YOUR-PAGE-URL-CONTAINS-THIS-FORM” with your Page URL containing your Submit Post Form.

Tip: to easily copy this shortcode, you can triple-click it (the URL will be highlighted)

post submission 1

Delete Post Shortcode

In the same way, add this shortcode to your single template.

The shortcode will be changed if you edit this form, so you have to refresh the Editor Page and then copy the shortcode. Replace “http://YOUR-DOMAIN.piotnet.com” with your Page URL containing your Submit Post Form. Replace sm=’p85459111′  and smpid=’233′ with the sm argument and smid argument in “Delete post shortcode”

Tip: to easily copy this shortcode, you can triple-click it (the URL will be highlighted)

post submission 2
post submission 3

Redirect Action

To redirect users to the post they just created:

Add Redirect feature from Actions After Submit and set Redirect URL = [post_url]

post submission 4

Only show the Form if the user logged in

Put the form into a Section

Edit Section > Advanced > Conditional Visibility